
How to Glute Bridge without Back Pain (2 Simple Tips) – Mobility Suite
- Dr. Mitch Israel
- Fitness, Hips, Lower Back, Movement & Pain
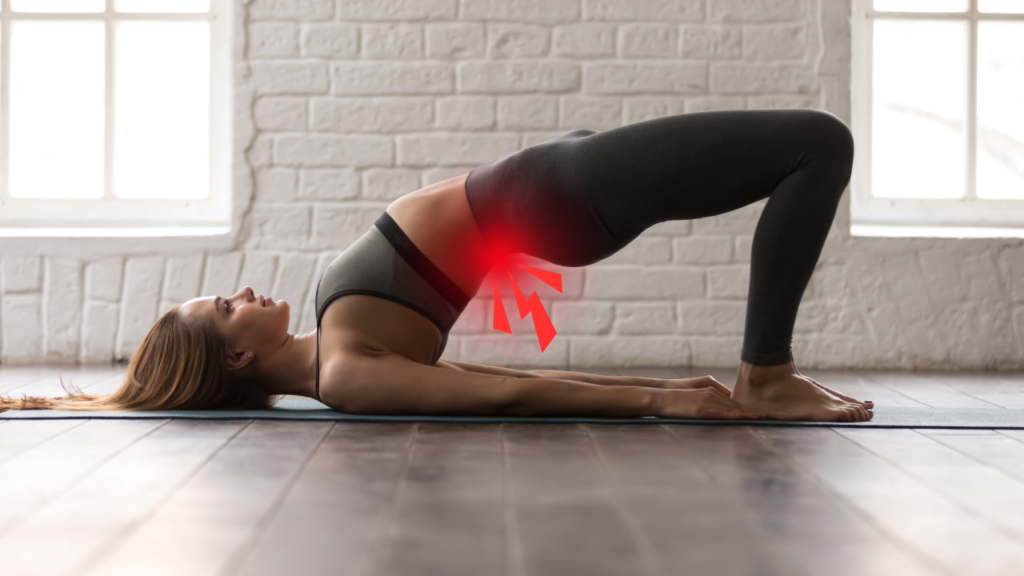
Lower back pain with glute bridges?
Are you trying to prioritize training your glutes but find yourself constantly battling back pain, especially with exercises as seemingly simple as the glute bridge? You’re in luck! In this blog, I’m going to show you how to overcome back pain during the glute bridge exercise so you can get back to effectively working those glutes without discomfort.
I’m Dr. Israel, and as someone who treats low back pain regularly, I can tell you that glute bridges are one of the top five movements causing my patient’s back pain. Let’s dive into some cues I give my patients to help them perform glute bridges without back pain.
If you prefer videos, watch the video version below!
The Common Issue: Alignment
The biggest issue with glute bridges causing back pain is improper alignment. When you don’t maintain proper alignment, the exercise can put undue stress on your lower back.
Here’s how to fix it:
- Start by lying flat on your back. Bend both knees until your feet are flat on the ground.
- Posteriorly pelvic tilt: Think about smashing your lower back against the ground and keeping it there. This posterior pelvic tilt is crucial.
- Rib cage down: Breathe out a little bit to bring your rib cage down. Now, you’re in a nice, stacked position.
- Maintain this alignment throughout the movement.
This method isolates the glutes more effectively, minimizing the risk of back pain.
Executing the Glute Bridge
Now that you have the proper alignment, here’s how to execute the glute bridge without back pain:
- Apply firm pressure with your feet into the ground.
- Raise your hips: Start to bring your hips up while maintaining the good stacked position. This is the end of your range while keeping the alignment. You should already feel your glutes more engaged.
- Avoid the common mistake: Don’t break this alignment by driving heavily into your heels and lifting your hips as high as possible. This turns it into a back bridge, causing back pain.
Remember, with the glute bridge, it’s not about how much range of motion you achieve but the precise amount of range with good positioning.
Troubleshooting Pelvic Positioning
If you’re having trouble finding that pelvic positioning, try this hack:
- Single Leg Bridge:
- Hug one knee close to your chest.
- With your back flat on the ground, drive the other foot into the ground to lift your hips.
- This position locks your spine in flexion, preventing it from extending and causing back pain.
Repeat this exercise five to six times on each side until you get the feeling you’re supposed to in the glutes. Then, switch back to the original glute bridge exercise with proper alignment.
Progressing with the Glute Bridge
Once you’ve mastered the positioning, you can start to add weight to your glute bridge. Always remember:
- Posteriorly pelvic tilt.
- Controlled range: Lift your hips with good alignment, then slowly lower them back down.
By following these tips, you’ll be able to perform the glute bridge exercise effectively without causing back pain.
Conclusion
Incorporating these simple tips can help you perform glute bridges without back pain. The same principles apply to hip thrusts. It’s all about the alignment: lock your rib cage and pelvis in place, then extend the hips to isolate the glute muscles more effectively.
By following these steps, you can turn your glute bridge from a source of back pain into an effective glute-strengthening exercise. Happy bridging!
Need a consistent plan for Mobility Training?
Do you know you need to train your mobility, but you don’t know where to start? Don’t worry, I have you covered! That is exactly why I created the Mobility Suite App so you can start mobility training for a fraction of the price of seeing a physical therapist and/or chiropractor!
I’ve created a library of mobility training programs (from hip mobility to spinal mobility) that you can have on-demand access to. These programs were carefully crafted to help you get the most out of mobility training with only minutes of work per training session! Less is more with mobility training. The most important thing is consistency! So, if you need a consistent strategy, start your FREE 7-day trial to my Mobility Suite App!
Why offer a 7-day free trial? I firmly adhere to the “1-week rule.” If you commit to consistent mobility training for one week, you’ll gather enough data to determine if it’s right for you. I’m confident that these programs will benefit you, and I want to give you the chance to experience it firsthand, completely free for one week. This way, you can determine whether mobility training aligns with your goals and needs without any financial commitment!
You have nothing to lose but the stiffness in your joints. Don’t let discomfort hold you back any longer— tap/click the button below to join today and take the first step toward a more mobile and pain-free lifestyle!