
How to FIX Your Tight Rhomboids for Good! – Mobility Suite
- Dr. Mitch Israel
- Mobility, Movement & Pain, Posture, Stretching
How to Relax Your Rhomboid Muscles: Tips and Exercises for Tension-Free Shoulders
Are tight knots between your shoulder blades constantly slowing you down? Pain in rhomboid muscles can make simple tasks like lifting, reaching, or even sitting at your desk feel unbearable. If you’re nodding in agreement, you’re not alone. Many people struggle with rhomboid tightness and discomfort, but the good news is that relief is possible. In this guide, we’ll walk you through a proven three-step method to release those stubborn knots, ease tension, and restore full mobility in your upper back—so you can get back to moving pain-free. Let’s dive into the solution that could finally bring you relief.
If you prefer videos, watch the video version below!
Understanding the Rhomboid Muscles
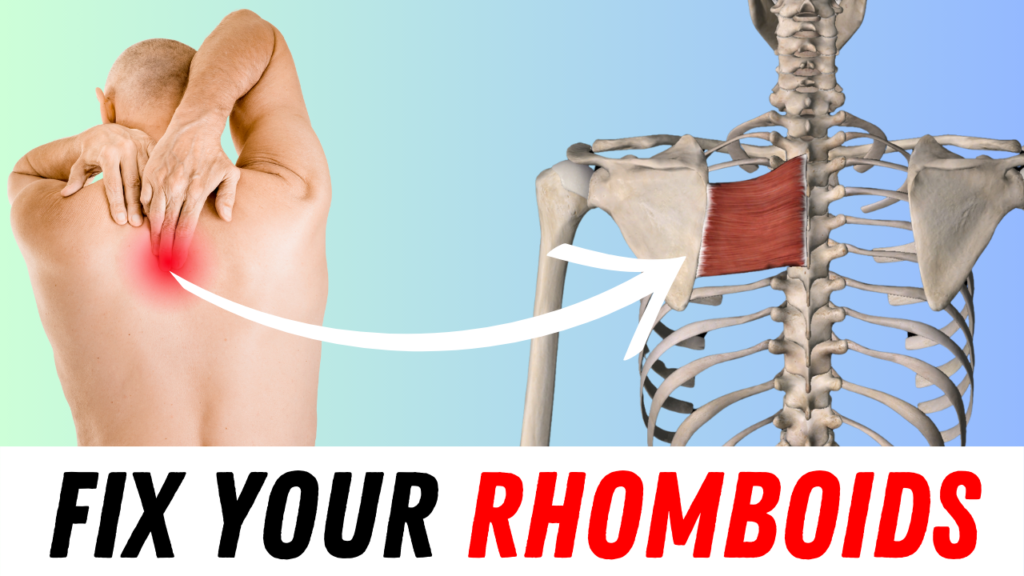
The rhomboids are a pair of muscles located in the upper back, connecting the spine to the inner edge of the shoulder blades. These muscles are responsible for retracting the shoulder blades, helping to maintain good posture and stabilize the shoulder girdle. Tight rhomboids can lead to discomfort, and restricted movement, and even contribute to shoulder and neck pain.
Why Does the Rhmoboids Become Tight and Painful?
Tight rhomboids and rhomboid pain can be attributed to several factors:
- Poor Posture: Slouching or hunching over can cause the rhomboids to become overstretched and weak, leading to tightness.
- Repetitive Movements: Activities that require repetitive arm motions can strain the rhomboids, leading to muscle knots.
- Sedentary Lifestyle: Lack of regular movement can cause muscles, including the rhomboids, to tighten and become painful.
- Stress: Emotional stress can cause muscle tension, particularly in the upper back and shoulder area.
A Three-Step Approach to Releasing a Tight Rhomboid Muscles
To effectively address tight rhomboids and rhomboid pain, we will follow a three-step approach that includes reducing muscle tension, restoring range of motion, and reinforcing stability.
Step 1: Reduce Tension in the Rhomboid Muscles
Tight rhomboids can cause significant discomfort and stiffness in your upper back. The first step to alleviating rhomboid pain is to reduce muscle tension. By loosening these muscles, you can decrease the frequency and severity of rhomboid pain and improve your overall comfort.
- Ball Release Technique:
- Use a lacrosse ball, tennis ball, or golf ball for this exercise.
- Place the ball between your shoulder blades and the wall, leaning into it to apply pressure.
- Roll the ball up and down until you find a tight spot. Once located, hold the pressure for about 30 seconds.
- To intensify the release, protract your shoulder blade or move your arm across your chest.
- You can also perform small circles with the ball to target the tightest areas.
This simple yet effective technique helps in loosening tight rhomboids and reducing muscle knots.

Step 2: Restore Range of Motion in the Rhomboids
After reducing tension, the next step is to restore the range of motion in the rhomboid area. This is crucial for managing tight rhomboids and minimizing rhomboid pain relief. By improving flexibility and movement in the upper back, you can prevent further stiffness and discomfort.
- Child’s Pose with Shoulder Blade Stretch:
- Start in a quadruped (all fours) position.
- Lower yourself into a child’s pose by sitting back on your heels, but keep your hands in front of you.
- Make a diamond shape with your hands around your forehead, and flare your elbows outward.
- Slowly round your upper back, separating your shoulder blades.
- Take 10 to 15 deep breaths, focusing on expanding the area between your shoulder blades.
For an enhanced stretch, use a yoga or exercise ball:
- Ball Hug:
- Hug the ball tightly to your chest, separating your shoulder blades.
- Rest your chest on the ball, breathing deeply to encourage expansion in the upper back.
This rhomboid muscle exercise is crucial for improving flexibility and movement in the rhomboid area, helping to alleviate rhomboid pain.
Step 3: Reinforce Stability in the Rhomobids
The final step is to reinforce stability and strength in the rhomboid muscles to maintain the improvements made. By targeting tight rhomboids with specific exercises, you can build resilience and reduce the likelihood of recurring rhomboid pain.
- Resistance Band Pulls:
- Hold a resistance band out in front of you.
- Shrug your shoulders up, then down, keeping them “parked.”
- Pull the band towards your chest, allowing your shoulder blades to come together.
- Slowly release the tension, letting your shoulder blades protract.
- Perform 10 to 15 repetitions.
For a more challenging variation:
- Resistance Band Pulls with Forehead and Belly Button Movement:
- After pulling the band halfway towards your chest, move the band up towards your forehead and down towards your belly button.
- Repeat this motion 10 to 15 times, keeping your shoulder blades engaged.
This rhomboid muscle exercise targets the rhomboids, promoting stability and strength, and ensuring your tight rhomboids remain loose and flexible.
Conclusion
Rhomboid pain relief is achievable with a focused three-step approach: reducing tension, restoring mobility, and reinforcing stability. You can effectively alleviate discomfort and enhance upper back health by targeting these key areas. Incorporating targeted rhomboid muscle exercises into your daily routine or as part of your warm-up before upper body workouts will ensure long-term relief and improved posture.
For those experiencing persistent pain or tight knots in the rhomboid area, consulting a medical or movement specialist is recommended for personalized treatment. Embark on this journey towards better mobility and sustained comfort—take charge of your movement and enjoy a pain-free lifestyle!
Need a consistent plan for Mobility Training?
Do you know you need to train your mobility, but you don’t know where to start? Don’t worry, I have you covered! That is exactly why I created the Mobility Suite App so you can start mobility training for a fraction of the price of seeing a physical therapist and/or chiropractor!
I’ve created a library of mobility training programs (from hip mobility to spinal mobility) that you can have on-demand access to. These programs were carefully crafted to help you get the most out of mobility training with only minutes of work per training session! Less is more with mobility training. The most important thing is consistency! So, if you need a consistent strategy, start your FREE 7-day trial to my Mobility Suite App!
Why offer a 7-day free trial? I firmly adhere to the “1-week rule.” If you commit to consistent mobility training for one week, you’ll gather enough data to determine if it’s right for you. I’m confident that these programs will benefit you, and I want to give you the chance to experience it firsthand, completely free for one week. This way, you can determine whether mobility training aligns with your goals and needs without any financial commitment!
You have nothing to lose but the stiffness in your joints. Don’t let discomfort hold you back any longer— tap/click the button below to join today and take the first step toward a more mobile and pain-free lifestyle!