
How to FIX your Rib Flare for Good – Mobility Suite
- Dr. Mitch Israel
- Mobility, Posture, Stretching
How to Fix Rib Flare: Effective Tips and Exercises for Better Posture
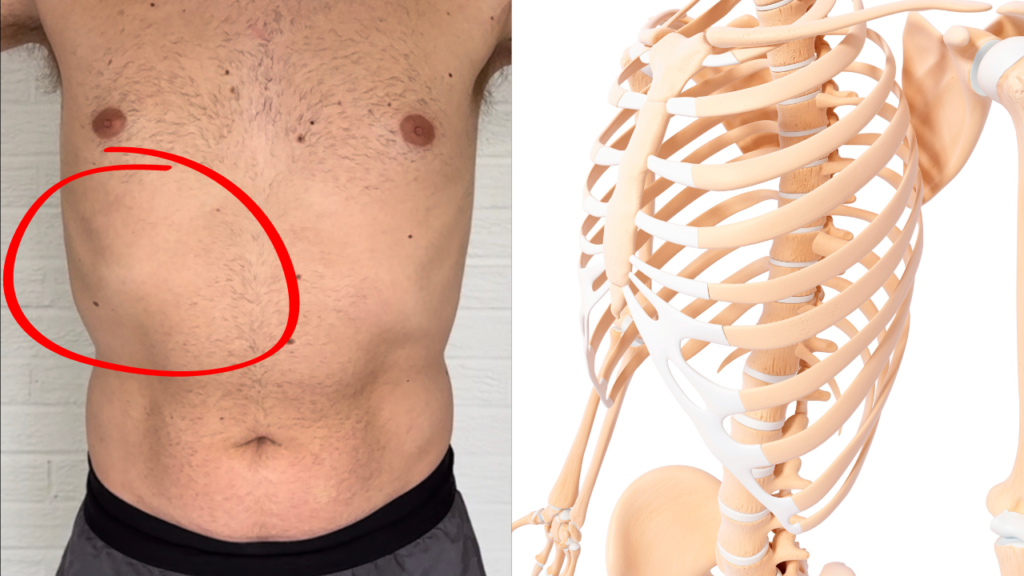
Rib flare is a postural misalignment where the lower ribs protrude outwards, creating an exaggerated arch in the lower back. This issue can lead to discomfort, poor posture, and even pain, particularly in the spine and core. But the good news is, it’s entirely fixable with the right approach. In this guide, we’ll walk you through how to fix rib flare using targeted exercises and techniques that address muscle tension, improve rib cage positioning, and build strength. By following these steps, you’ll be on your way to better rib flare posture, enhanced core stability, and long-term relief from rib flare discomfort.
If you prefer videos, watch the video version below!
Understanding Rib Flare
Rib flare occurs when the lower ribs protrude outwards, causing an exaggerated arch in the lower back. This misalignment can disrupt the harmony between the rib cage and the pelvis, leading to poor posture and potential pain or discomfort.
Why Rib Flare Posture Happens
Rib flare posture can result from several factors:
- Weak Core Muscles: Insufficient core strength can cause the rib cage to tilt upwards and outwards.
- Poor Posture: Sitting or standing with poor alignment can exacerbate rib flare.
- Tight Spinal Muscles: Tightness in the muscles surrounding the spine can pull the ribs out of alignment.
- Breathing Patterns: Shallow or chest-dominant breathing can contribute to rib flare by overworking the upper chest muscles.
A Three-Step Approach to Fix Rib Flare
If you are wondering about “how to fix rib flare” it’s essential to follow a structured approach that addresses muscle tension, improves rib cage positioning, and reinforces strength and stability. Here’s a detailed plan:
1. Reduce Spinal Muscle Tension Using a Foam Roller
Reducing muscle tension is the first step to alleviating the flare and preparing the body for further rib flare exercises.
- Foam Roller Spinal Release:
- Lie on your back with a foam roller placed horizontally under your upper back.
- Gently roll up and down along your spine, focusing on the areas around your mid and lower back.
- Spend extra time on any tight or tender spots, applying gentle pressure.
- Perform this exercise for 2-3 minutes.
This technique helps to release rib flare muscle tension in the spinal muscles, allowing the rib cage to move more freely and reducing the exaggerated arch that contributes to rib flare.
2. Improve Rib Cage Positioning with Posterior Expansion Breathing in a Child's Pose Position
Once rib flare muscle tension is reduced, the next step is to improve the positioning of the rib cage through proper breathing techniques.
- Posterior Expansion Breathing in Child’s Pose:
- Start in a child’s pose position with your knees apart and your big toes touching. Sit back onto your heels and extend your arms forward on the ground.
- Focus on deep, diaphragmatic breathing, inhaling deeply through your nose and directing the breath into your lower back and sides of the rib cage.
- Exhale fully, feeling your rib cage settle down and your core engage.
- Perform 2-3 sets of 5-8 deep breaths.
This breathing exercise helps to enhance the mobility of the rib cage and promotes a more neutral spine position, crucial for fixing rib flare.
3. Reinforce with Strength and Stability Using an Overhead Reach Exercise
Building strength and stability in the core and shoulders is essential for maintaining proper rib cage positioning and preventing rib flare.
- Overhead Reach Exercise:
- Stand with your feet hip-width apart and engage your core muscles.
- Hold a light weight or resistance band overhead with both hands, ensuring your ribs stay down and your core remains engaged.
- Slowly lower your arms in front of you while maintaining the rib cage position, then return to the starting position.
- Perform 2-3 sets of 10-15 repetitions.
The overhead reach exercise strengthens the muscles of the core and shoulders while emphasizing proper rib cage alignment, helping to fix rib flare for good.
Conclusion
Fixing rib flare requires a comprehensive approach that addresses rib flare muscle tension, improves rib cage positioning, and reinforces strength and stability. By incorporating the foam roller spinal release, posterior expansion breathing in a child’s pose, and overhead reach rib flare exercises into your routine, you can effectively alleviate rib flare and improve your rib flair posture.
When it comes to your question of “how to fix rib flare,” Consistency is key—regularly practicing these rib flare exercises will help you maintain a neutral rib cage position and prevent rib flare from recurring. If your symptoms persist or worsen, consider consulting with a healthcare professional for personalized advice and treatment. By taking proactive steps to fix rib flare, you can enjoy better posture, reduced discomfort, and a more aligned body.
Start incorporating these strategies today and experience the benefits of improved posture and core stability. Fix rib flare for good and reclaim your comfort and confidence!
Consistency is key—regularly practicing these exercises will help you maintain a neutral rib cage position and prevent rib flare from recurring. If your symptoms persist or worsen, consider consulting with a healthcare professional for personalized advice and treatment. By taking proactive steps to fix rib flare, you can enjoy better posture, reduced discomfort, and a more aligned body.
Start incorporating these strategies today and experience the benefits of improved posture and core stability. Fix rib flare for good and reclaim your comfort and confidence!
Need a consistent plan for Mobility Training?
Do you know you need to train your mobility, but you don’t know where to start? Don’t worry, I have you covered! That is exactly why I created the Mobility Suite App so you can start mobility training for a fraction of the price of seeing a physical therapist and/or chiropractor!
I’ve created a library of mobility training programs (from hip mobility to spinal mobility) that you can have on-demand access to. These programs were carefully crafted to help you get the most out of mobility training with only minutes of work per training session! Less is more with mobility training. The most important thing is consistency! So, if you need a consistent strategy, start your FREE 7-day trial to my Mobility Suite App!
Why offer a 7-day free trial? I firmly adhere to the “1-week rule.” If you commit to consistent mobility training for one week, you’ll gather enough data to determine if it’s right for you. I’m confident that these programs will benefit you, and I want to give you the chance to experience it firsthand, completely free for one week. This way, you can determine whether mobility training aligns with your goals and needs without any financial commitment!
You have nothing to lose but the stiffness in your joints. Don’t let discomfort hold you back any longer— tap/click the button below to join today and take the first step toward a more mobile and pain-free lifestyle!